

PostgreSQL Connection Pooling and Load Balancing with PgPool-II Cluster (Updated)


In this post, I will walk you through on how to perform load balancing and connection pooling with PgPool-II, what are the benefits and motivation of having PgPool-II and most importantly, how to set up a PgPool-II cluster.
In this tutorial, you will find me using rds_pgpool, a Docker image for the sake of simplifying installation and configuration.
Motivation
Load Balancing: We want to offload some of the read requests to our read replicas.
Connection Pool: Instead of receiving an error when connections to our master node reaches maximum, we want to queue it. Also, we want to reduce overhead by reusing database connections.
Our Architecture
In our case, we use AWS RDS for PostgreSQL in master-slave mode. We elected one master and data are replicated to one read slaves.
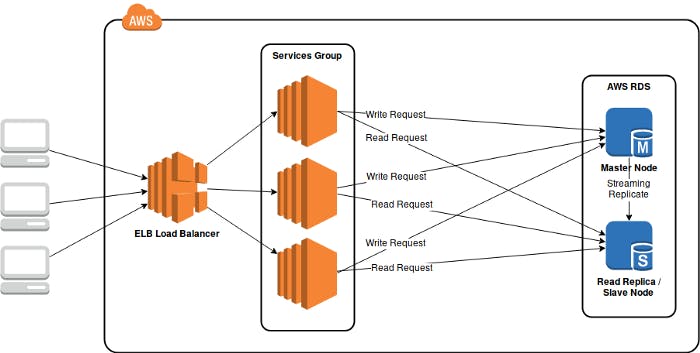
Load balancing at service layer
Before adding PgPool-II into our stack (the diagram above), database load balancing depends on respective service. Application services have to identify database requests and send them to respective database. In our case, despite the framework we use allows us to use multiple database, providing similar load balancing feature, the effort required simply doesn’t worth the while.
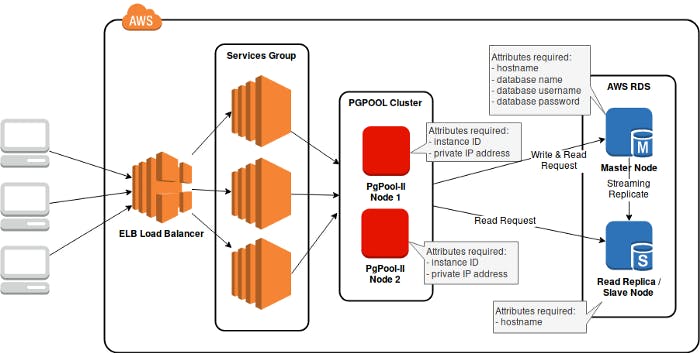
Therefore, I decided to give PgPool-II a try. A new layer is to be added into our stack, which results in the diagram below:

Load balancing using PgPool-II cluster (marked with a yellow star)
What is Pgpool-II?
From its official website, it is a middleware sits between Postgres clients and servers, serves as a database proxy. The main features are:
- Connection pooling ->We need this to reduce overhead of connection establishment by reusing a pool of connection.
- Load balancing ->We need this feature to offload some of the read requests to our read replica.
- Limiting Exceeding Connection -> When connections to PostgreSQL server reaches maximum limit, further connection will be rejected, whereas by using PgPool-II, exceeding connections are queued instead of being rejected right away.
- Replication -> This is not used as we are using AWS RDS Replication, which uses PostgreSQL native streaming replication. [1]
Running PgPool-II in Cluster Mode with rds_pgpool
PgPool-II operates in 2 modes: Single-Node and Cluster Mode. To simplify installation and configuration, I created a Docker image rds_pgpool. In this post, I will be focusing on setting up a 2-Node PgPool-II cluster using AWS EC2.
Let’s assume our database cluster are made up of 1 master and 1 slave/read replica.
Prerequisite
- PostgreSQL cluster that uses native streaming replication. (If you are using AWS RDS, with PostgreSQL version >9.3.5, streaming replication is used by default)
How Cluster Mode Works?
In PgPool-II cluster mode, only 1 node will be accepting connections at a time (it is, of course, the master node). The watchdog of each node will perform heartbeat checking to the master node. In case of failure to detect master node, the slave/standby node assumes the master is down and takes over the master role.
In order to take over the role of the master node, each node must first be assigned 2 scripts: escalation and de-escalation script. Escalation script is run when promotion to master being initiated. De-escalation script is run when the node is being shutdown or restarted.
In the rds_pgpool Docker image, the escalation script runs a aws-cli command to assign the Elastic IP to the node itself while the de-escalation script detaches and releases the Elastic IP.
Step 1: Prepare EC2 Instances, Elastic IP
I created 2 t2.micro instances for this tutorial. In my case, I chose Amazon Linux AMI 2018.03.0 (HVM) as my machine image.

1 instance for each PgPool-II node
While creating EC2 instances, ensure they accept inbound connection of each other to ports 9000, 9999 and 9696.
Next, allocate an Elastic IP but leave it disassociated for now.

Allocate an Elastic IP, leave it disassociated for now
Step 2: Install Docker-Compose
Amazon Linux AMI comes with Docker but not Docker-Compose. To install it, run:
curl -L https://github.com/docker/compose/releases/download/1.23.2/docker-compose-`uname -s`-`uname -m` > /usr/local/bin/docker-compose
then:
chmod +x /usr/local/bin/docker-compose
Step 3: Gather Database Credentials, Instance Details
We would need the following details of our database and PgPool-II nodes.
Attributes required for each database and PgPool-II node
(UPDATE) Step 3.5: Calculate Max Connection Pool
For connection pooling, we have to calculate the maximum connection allowed to our master node. If this is miscalculated, it it likely that we will encounter the error kind does not match between master(xx) slot[x](xx).
The rule of thumb:
num_of_connections = max_connection - reserved_connection
To check the max connection allowed, run this in psql:
show max_connections;
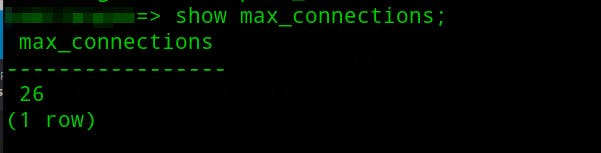
Max connections is 26. In AWS RDS, this is determined based on your instance size.
Since the reserve connection is usually 3, number of connections in our pool should be 26 — 3 = 23.
Say now our database allows a maximum of 23 non-superuser connection, we have to adjust our configurations. There are two knobs in our case:
- num_init_children -> Maximum child processes PgPool-II could spawn
- max_pool -> Number of connections cached per child
The rule of thumb should always be:
num_init_children * max_pool <= num_of_connections
Let’s say we want to have 7 child processes, the maximum connection per child should be 23 / 7 ~= 3.
Thus, num_init_children should be 7 and max_pool should be 3.
Step 4: Prepare docker-compose.yml
Assuming these are the instance-ids and IPs:
- Node 1 instance id: i-ababababab
- Node 1 private IP: 172.33.11.11
- Node 2 instance id: i-xyxyxyxy
- Node 2 private IP: 172.33.33.33
- Elastic IP: 55.55.55.55
and these are our database attributes:
- Master DB Hostname: xxxx.xxxx.ap-southeast-1.rds.amazonaws.com
- Slave DB Hostname: yyyy.yyyy.ap-southeast-1.rds.amazonaws.com
- Database name: postgres
- Database username: postgres
- Database password: postgres
(UPDATE) In version 0.2.8, environment variables NUM_INIT_CHILDREN and MAX_POOL are added to set the connection pool size.
docker-compose.yml for Node 1 should be:
version: "3"
services:
  pgpool:
    restart: 'always'
    image: melvinkcx/rds_pgpool:0.2.8
    ports:
      - "9999:9999"
      - "9000:9000"
      - "9694:9694"
    environment:
      - DB_NAME=postgres
      - DB_USERNAME=postgres
      - DB_PASSWORD=postgres
      - MASTER_NODE_HOSTNAME=xxxx.xxxx.ap-southeast-1.rds.amazonaws.com
      - REPLICA_NODE_HOSTNAME_0=yyyy.yyyy.ap-southeast-1.rds.amazonaws.com
      - CLUSTER_MODE=true
      - NUM_INIT_CHILDREN=7
      - MAX_POOL=3
      - AWS_ACCESS_KEY=<your aws access key>
      - AWS_SECRET_KEY=<your aws secret key>
      - AWS_DEFAULT_REGION=<your aws ec2 default region>
      - ELASTIC_IP=55.55.55.55
      - SELF_INSTANCE_ID=i-abababab
      - SELF_PRIVATE_IP=172.33.11.11
      - STANDBY_INSTANCE_PRIVATE_IP=172.33.33.33
Save it as docker-compose_node1.yml in your PgPool-II node 1.
For Node 2, save the following as docker-compose_node2.yml in your PgPool-II node 2.
version: "3"
services:
  pgpool:
    restart: 'always'
    image: melvinkcx/rds_pgpool:0.2.8
    ports:
      - "9999:9999"
      - "9000:9000"
      - "9694:9694"
    environment:
      - DB_NAME=postgres
      - DB_USERNAME=postgres
      - DB_PASSWORD=postgres
      - MASTER_NODE_HOSTNAME=xxxx.xxxx.ap-southeast-1.rds.amazonaws.com
      - REPLICA_NODE_HOSTNAME_0=yyyy.yyyy.ap-southeast-1.rds.amazonaws.com
      - CLUSTER_MODE=true
      - NUM_INIT_CHILDREN=7
      - MAX_POOL=3
      - AWS_ACCESS_KEY=<your aws access key>
      - AWS_SECRET_KEY=<your aws secret key>
      - AWS_DEFAULT_REGION=<your aws ec2 default region>
      - ELASTIC_IP=55.55.55.55
      - SELF_INSTANCE_ID=i-xyxyxyxy
      - SELF_PRIVATE_IP=172.33.33.33
      - STANDBY_INSTANCE_PRIVATE_IP=172.33.11.11
Step 5: Run your docker-compose
On each node, navigate to the directory of your docker-compose files, run:
docker-compose -f <your_docker_compose_filename.yml> up -d
After starting both nodes, pull the logs and observe the behavior:
docker logs <your_docker_container_id>
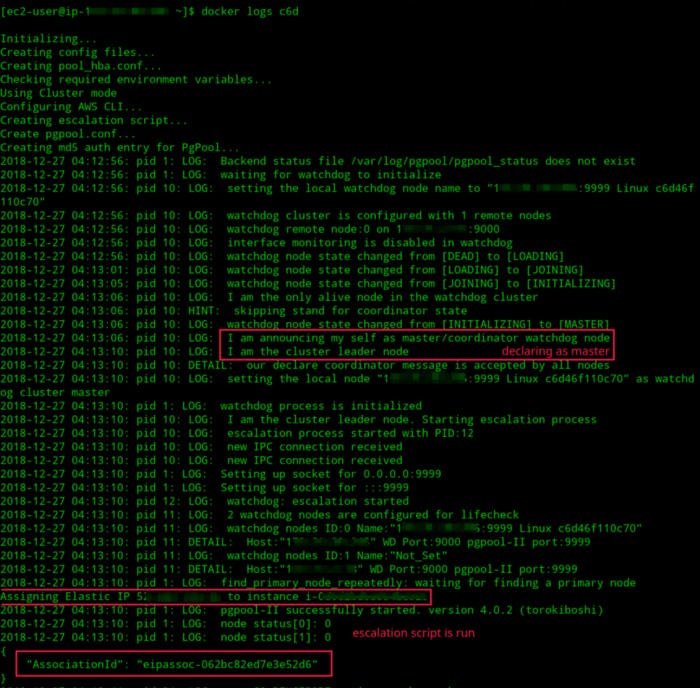
Logs of PgPool-II node (It is now a master node)
Step 6: Connecting PgPool-II
To make use of PgPool-II, re-configure your client apps to connect to the cluster instead of your database instances directly.
For instance, the Elastic IP of your PgPool-II cluster is 55.55.55.55, your client apps should now be connecting to 55.55.55.55 with port 9999.
You can also try your connection by connecting to your PgPool-II cluster with psql:
psql -h 55.55.55.55 -p 9999 -U <username> -W
Testing
Test Load Balancing
To test if PgPool-II is indeed performing load balancing we run pgbench to simulate read requests.
pgbench -h localhost -p 9999 -U <username> -c 10 -T 10 -S
After running pgbench , we run the following to see if queries are distributed across database nodes:
psql -h localhost -p 9999 -U <username> -W -c "show pool_nodes"
You should see a table as this:

Look at
select_cntofshow pool_nodes;
Test PgPool-II Failover
To test its failover mechanism, simply stop/reboot one of the nodes. In my case, I restarted Node 1.
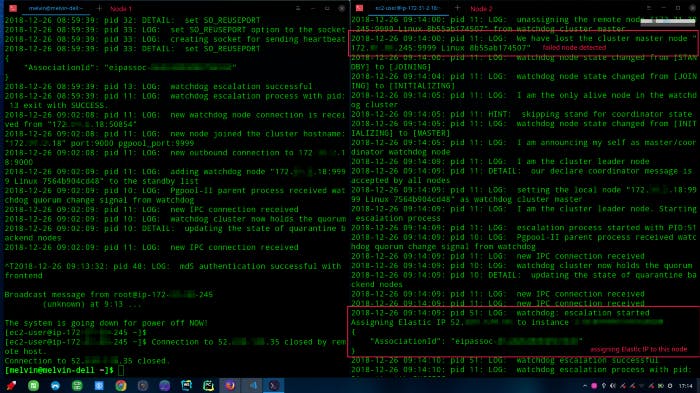
On the right: Node 2 detected the master node is down and hence electing itself as master.
The logs in Node 2 shown that it is able to detect Node 1 is down and has elected itself to take over Node 1.
Running PgPool-II In Single-Node
rds_pgpool comes with the option to run in single-node mode. Refer to the README for more details.
Resources
Your like will definitely drive me further. Feel free to give one if you find this useful.
First published on 2018-12-31
Republished on Hackernoon